
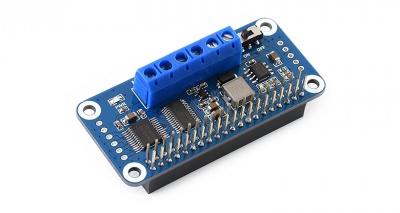
Motor Driver HAT
| ||
Introduction
Provides control demos for Raspberry Pi and Jetson nano.
Hardware Description
Features
- Based on Raspberry Pi interface design, suitable for Raspberry Pi Zero/Zero W/Zero WH/2B/3B/3B+.
- I2C is controlled, by setting 5 address jumpers, it is stackable up to 32x this module.
- Onboard PCA9685 chip, provides 12-bit hardware PWM to adjust the motor speed.
- Onboard TB6612FNG dual H-bridge motor driver, high efficiency, low heating.
- Integrates 5V regulator, up to 3A output current, can be powered from battery through VIN terminal.
- Reserved I2C control pins, allows to work with other control boards.
Interfaces

| PIN | Description |
| 5V | 5V |
| 3V3 | 3.3V |
| GND | Ground |
| SDA | I2C Data Pin |
| SCL | I2C Clock Pin |
| VIN | Driver voltage for motor(6-12V) |
| A1 | positive pole of motor A |
| A2 | negative pole of motor A |
| B1 | positive pole of motor B |
| B2 | negative pole of motor B |
Resource Introduction
Power

MP1854 regulator is used to convert the input voltage (VIN_USER), has a wide 4.5V to 28V input range, and could provide 3A output. Even the chip supports 28V input, however, VIN_USER is also the power supply for the motor, so the actual working voltage of this module is 6-12V.
MP1854 outputs stable 5V, which is used to power Raspberry Pi, and supplies 3.3V logic level for PWM and motor driver via RT9193-33.
PWM
Raspberry Pi only has one hardware PWM pin (GPIO.1), and the software PWM of WiringPi and Python will cost CPU resources. We use PCA9685 on this module with I2C bus control, supporting 16-channel 12-bit PWM output. The frequency range of PWM is 40Hz to 1000Hz.
It is very simple to use, to output a PWM signal you only need to control the corresponding register value of the chip.

Refer to the recommended circuit, LED0-LED5 are motor control pins.
A0-A4 is the address of the slave device that controls PCA9685.
From Page6 to Page8 of datasheet:

The slave address of the I2C bus is 7 bits, highest is fixed 1. A5-A0 are hardware selectable.
This Motor Driver HAT, A5 is connected to ground (0) by default, you can change resistors of A0-A4 to configure the slave address. If you weld a resistor or short it, means 1, otherwise 0. The address ranges from 0x40 to 0x5F.

Motor driver

TB6612FNG is a dual H-bridge motor driver chip, which works efficiently and is not easy to generate heat.
VIN_USER is the input voltage, in theory, the motor speeds up if this voltage is increased. The recommended input voltage is 6~12V.
PWMA and PWMB control speed of motors, AIN1 and AIN2, BIN1 and BIN2 control rotate direction of motors.
A1 and A2, B1 and B2 are connected to the positive/negative poles of two motors separately.
Raspberry Pi
Enable I2C Interface
To work with Raspberry Pi, you should first enable the I2C interface as below:
sudo raspi-config
Then choose Interfacing Options -> I2C -> Yes  Start the i2C kernel driver


Then restart the Raspberry Pi:
sudo reboot
Install Libraries
- Install BCM2835 libraries
wget http://www.airspayce.com/mikem/bcm2835/bcm2835-1.70.tar.gz
tar zxvf bcm2835-1.70.tar.gz
cd bcm2835-1.70/
sudo ./configure
sudo make && sudo make check && sudo make install
#For more information, please refer to the official website http://www.airspayce.com/mikem/bcm2835/
- Install wiringPi libraries
sudo apt-get install wiringpi
#For raspberry PI systems after May 2019 (those earlier may not need to be implemented), an upgrade may be required:
wget https://project-downloads.drogon.net/wiringpi-latest.deb
sudo dpkg -i wiringpi-latest.deb
gpio -v
#If gPIO -v is not installed, the 2.52 version will appear
- Install Python libraries
#python2
sudo apt-get updata
sudo apt-get install python-pip
sudo pip install RPi.GPIO
sudo apt-get install python-smbus
#python3
sudo apt-get update
sudo apt-get install python3-pip
sudo pip3 install RPi.GPIO
sudo apt-get install python3-serial
Download the sample program and unzip it to the specified directory
sudo apt-get install p7zip
wget https://files.waveshare.com/upload/9/9a/Motor_Driver_HAT_Code.7z
7zr x Motor_Driver_HAT_Code.7z -r -o./Motor_Driver_HAT_Code
sudo chmod 777 -R Motor_Driver_HAT_Code
cd Motor_Driver_HAT_Code/Raspberry\ Pi/
Run the testing demo
- c
cd c/
make clean
make
sudo ./main
- python
cd python/
sudo python3 main.py
Horizon Sunrise X3 Pi
Install Library File
sudo apt update
sudo pip3 install python3-smbus
Download the Example Demo and Unzip It to the Specified Directory
sudo apt-get install p7zip
wget https://files.waveshare.com/upload/9/9a/Motor_Driver_HAT_Code.7z
7zr x Motor_Driver_HAT_Code.7z -r -o./Motor_Driver_HAT_Code
sudo chmod 777 -R Motor_Driver_HAT_Code
cd Motor_Driver_HAT_Code/Sunrise_X3/python/
Run the Demo
sudo python3 main.py
VisionFive2
Install Library File
apt-get install pip
pip install VisionFive.gpio
apt-get install python3-smbus
Download the Example Demo and unzip it to the Specified Directory
apt-get install p7zip-full
wget https://files.waveshare.com/upload/9/9a/Motor_Driver_HAT_Code.7z
7zr x Motor_Driver_HAT_Code.7z -r -o./Motor_Driver_HAT_Code
cd Motor_Driver_HAT_Code/VisionFive2/python/
Run the Demo
python3 main.py
Jetson Nano
Install Libraries
- Open the terminal interface and enter the following command to install the corresponding function library
sudo apt-get update
sudo apt-get install python3-pip
sudo pip3 install Jetson.GPIO
sudo groupadd -f -r gpio
sudo usermod -a -G gpio your_user_name
sudo cp /opt/nvidia/jetson-gpio/etc/99-gpio.rules /etc/udev/rules.d/
sudo udevadm control --reload-rules && sudo udevadm trigger
[Note] Your_user_name, such as waveshare
- Install I2C
sudo apt-get install python-smbus
- Install image processing library:
sudo apt-get install python3-pil
sudo apt-get install python3-numpy
Download the sample program and unzip it to the specified directory
sudo apt-get install p7zip
wget https://files.waveshare.com/upload/9/9a/Motor_Driver_HAT_Code.7z
7zr x Motor_Driver_HAT_Code.7z -r -o./Motor_Driver_HAT_Code
sudo chmod 777 -R Motor_Driver_HAT_Code
cd Motor_Driver_HAT_Code/Jetson\ Nano/
Run the test demo
- python2
cd python2/
sudo python main.py
- python3
cd python3/
sudo python3 main.py
Resource
Document
Demo
Data sheet
Support
Technical Support
If you need technical support or have any feedback/review, please click the Submit Now button to submit a ticket, Our support team will check and reply to you within 1 to 2 working days. Please be patient as we make every effort to help you to resolve the issue.
Working Time: 9 AM - 6 AM GMT+8 (Monday to Friday)