


 Required
Powerful RGB LED strip, adjustable tricolor light
Product list:
『BD139 transistor 』 view more: https://www.utsource.net/itm/p/836289.html
『22k resistor』 view more: https://www.utsource.net/sch/22k%20resistor
Step descriptions:
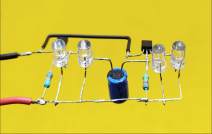
Step 1:-Prepare all the part need in this videos: 8050 transistor X3, 220uF capacitor 8*10mm X3, 10k resistor 0.5W X3, RGB strip DC 12V X1 and Some wire jumpers
Step 2: -Solder all the transistors, capacitors and resistors one by one as showed in the pic below.
Step 3: -Then solder the jumper as showed in the pic below.
Step 4: -Cut a piece of solder and solder it to the other end of the 3 resistors.
Step 5: -Use another piece of solder and solder it to the other pins of the 3 transistors.
Step 6: -Solder wires as showed in the pic.
Step 7: -Solder the wires to the RGB BLED.
Step 8: Connect it to the power supper and the RGB LED is shinning.
Get the parts from our online store: https://www.utsource.net
Know more about Utsource: https://www.youtube.com/watch?v=tmJQq0FS9y8
Subscribe to Utsource channel: https://www.youtube.com/channel/UCsWmWwb0S68rruOf8ebN8JQ/featured
Contact us:Email: sales@utsource.com
Follow us:
Facebook: https://www.facebook.com/utsource.net
Twitter: https://twitter.com/pantiejun
LinkedIn: https://www.linkedin.com/company/utsource
ВКонтакте: https://vk.com/utsource
Instagram: https://www.instagram.com/utsource_official
Pinterest: https://www.pinterest.com/bestutsource